
Introduction: Why Drought-Tolerant Landscaping Matters in Southeast Seminole Heights
Homeowners in Southeast Seminole Heights are seeking smarter ways to create beautiful, sustainable yards that thrive in Florida’s challenging climate. With unpredictable rainfall, periodic droughts, and the ongoing need to conserve water, traditional lawns and thirsty plants are falling out of favor. Instead, more residents are turning to drought-tolerant landscaping—also called xeriscaping—as a practical and eco-friendly alternative. This approach uses native and adapted plants, strategic design, and efficient irrigation to minimize water use while maximizing curb appeal and property value.
But transforming your yard for drought resilience isn’t just about swapping turf for gravel. Success hinges on local plant knowledge, solid planning, and understanding Southeast Seminole Heights’ unique environment. You’ll need to account for soil types, sun exposure, rainfall patterns, and neighborhood guidelines. In this comprehensive step-by-step guide, you’ll learn everything you need to know to create a thriving, low-water landscape—from planning and budgeting to plant selection, installation, and maintenance. Whether you’re a seasoned gardener or a first-time renovator, you’ll discover practical advice tailored to our neighborhood’s needs, plus insider tips to avoid costly mistakes and ensure long-term success.
Step 1: Assess Your Yard and Set Realistic Goals
Understand Your Site Conditions
Begin by evaluating the unique characteristics of your property. Walk around your yard and make notes or sketches of:
- Sun and Shade Patterns: Track which areas receive full sun, partial shade, or deep shade throughout the day. This affects plant choices.
- Soil Type: Southeast Seminole Heights typically has sandy soils, but pockets of clay or muck aren’t uncommon. Test soil drainage by digging a small hole, filling with water, and timing how long it drains.
- Topography: Note slopes, low spots prone to flooding, and high areas that dry quickly.
- Existing Vegetation and Hardscapes: Identify plants and features you’d like to keep, remove, or repurpose.
Set Your Project Goals
Think about what you want from your new landscape. Common goals include:
- Reducing water use and maintenance
- Improving curb appeal
- Attracting pollinators and wildlife
- Creating outdoor living or play spaces
- Complying with HOA or city guidelines
Write down your priorities and must-haves before moving forward.
Step 2: Plan Your Drought-Tolerant Design
Start with a Scaled Drawing
Sketch your yard to scale, marking buildings, driveways, walkways, existing trees, and other permanent features. Free online tools like SmartDraw or simple graph paper work well for this step. This will help you visualize plant groupings and hardscape areas.
Group Plants by Water Needs (Hydrozoning)
Hydrozoning means grouping plants with similar water requirements together. This makes irrigation more efficient and prevents overwatering or underwatering.
- Low-Water Zones: Use native and adapted drought-tolerant plants in the driest spots.
- Moderate-Water Zones: Reserve for accent plants or spots near patios that may need occasional supplemental watering.
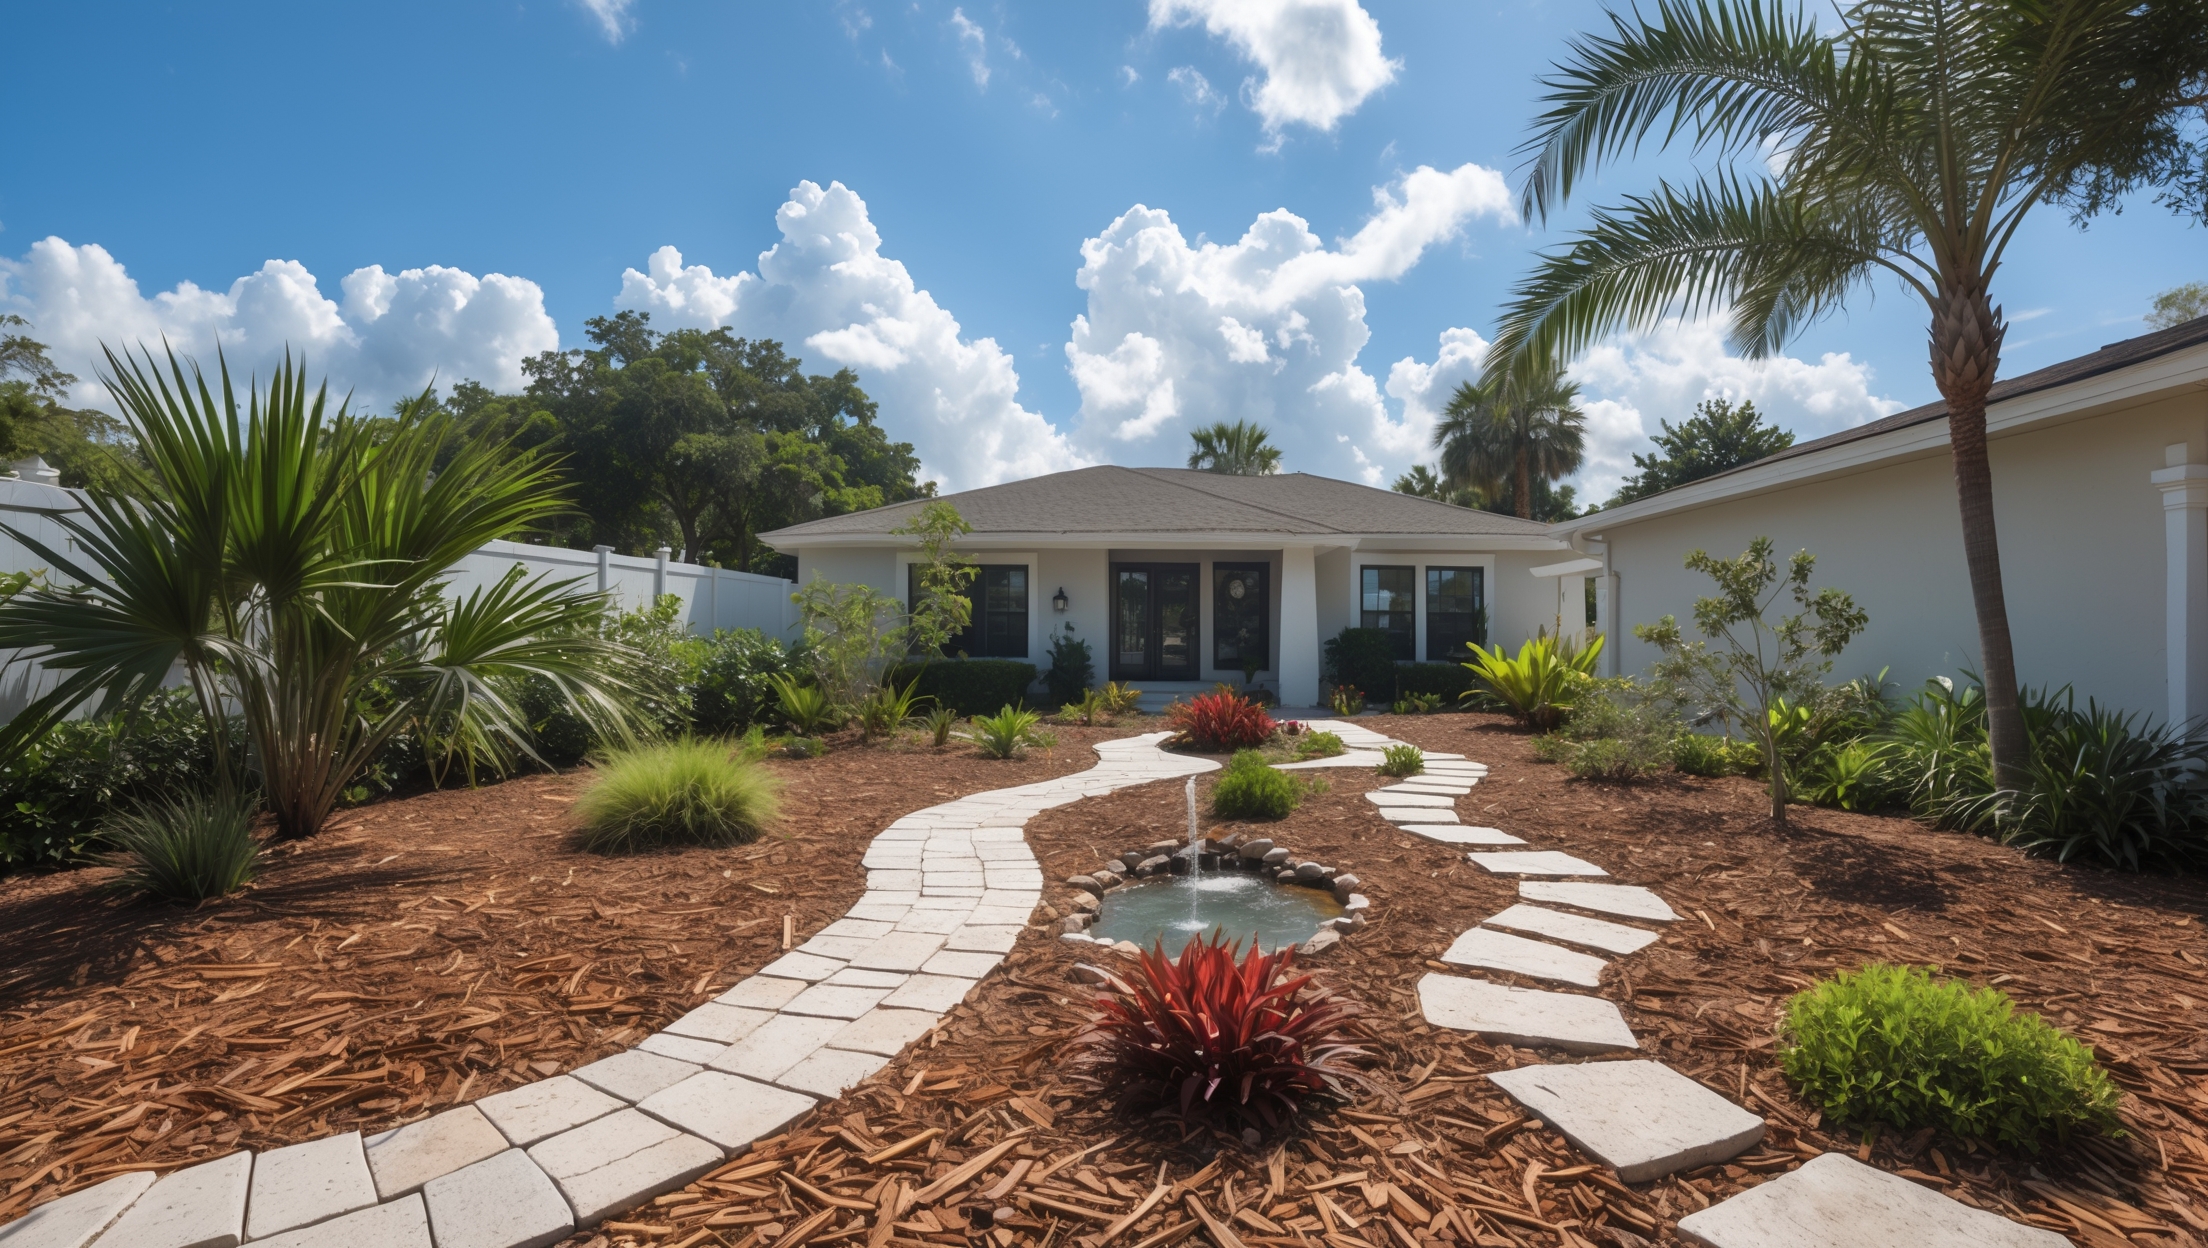
Incorporate Hardscape and Mulch
Replace some lawn with attractive, low-maintenance hardscape elements:
- Stone or gravel pathways
- Mulched planting beds
- Decorative boulders
- Rain gardens or dry creek beds for drainage
Choose light-colored materials to reflect heat and reduce water evaporation.
Step 3: Select the Best Drought-Tolerant Plants for Southeast Seminole Heights
Focus on Florida Natives and Well-Adapted Species
Florida native plants are naturally suited to our climate, soils, and pests—meaning less water, fewer chemicals, and better resilience. Some top picks for Southeast Seminole Heights include:
- Groundcovers: Sunshine mimosa (Mimosa strigillosa), Railroad vine (Ipomoea pes-caprae)
- Perennials: Black-eyed Susan (Rudbeckia hirta), Blanket flower (Gaillardia pulchella), Coreopsis (Coreopsis spp.)
- Shrubs: Firebush (Hamelia patens), Simpson’s stopper (Myrcianthes fragrans), Walter’s viburnum (Viburnum obovatum)
- Ornamental Grasses: Muhly grass (Muhlenbergia capillaris), Fakahatchee grass (Tripsacum dactyloides)
- Accent Plants: Coontie (Zamia integrifolia), Saw palmetto (Serenoa repens)
Check Local Availability
Visit reputable local nurseries or the Florida Native Plant Society – Seminole Heights Chapter for plant lists and sources. Avoid invasive species and look for plants labeled as “Florida Friendly” or “drought-tolerant.” Don’t hesitate to ask staff for advice on what thrives in our neighborhood’s microclimate.
Consider Mature Size and Growth Habit
Choose plants that will fit your space at maturity. Overcrowding leads to disease, while too much spacing exposes soil and increases weeds. Use layered plantings—groundcovers in front, perennials in the middle, and shrubs at the back—for a lush look with minimal water needs.
Step 4: Budgeting and Cost Breakdown
Estimate Your Expenses
- Site Prep: Removing turf and prepping soil ($0.50–$1.50/sq ft if DIY; $2–$4/sq ft if hired out)
- Plants: $3–$10 per 1-gallon native plant; more for mature specimens
- Mulch: $2–$4 per bag or $30–$40 per cubic yard (pine bark, pine straw, or melaleuca recommended)
- Hardscape Materials: $3–$6/sq ft for gravel, $8–$18/sq ft for flagstone or pavers
- Irrigation Upgrades: $200–$800 for drip system retrofit
- Labor: $25–$50/hour if hiring help
For a typical 500 sq ft front yard, expect a DIY budget of $1,000–$2,500; professional installation can run $3,500–$7,000 or more, depending on materials and complexity.
Ways to Save
- Start small—convert one section at a time
- Share bulk mulch or plant orders with neighbors
- Propagate plants from cuttings or local swaps
- Use reclaimed materials for paths and borders
Step 5: Navigating Local Compliance and Permits
City of Tampa and HOA Considerations
Most drought-tolerant landscaping projects require little or no permitting—but always check the City of Tampa’s code and your neighborhood’s HOA guidelines. Key points:
- Front Yard Regulations: Lawns can be reduced or replaced with mulch and plant beds, but some HOAs require a certain percentage of “living” landscape (not just gravel).
- Tree Removal: Protected trees (like oaks) require a permit for removal or major pruning.
- Stormwater Management: Avoid blocking swales or drainage features; rain gardens may need extra review if near the street.
Contact the City of Tampa Planning & Development Department or your HOA board before starting. Document your plans—including plant lists and sketches—in case questions arise.
Step 6: Preparation and Installation
Remove Existing Turf and Weeds
For lasting results, removing grass and weeds is essential. Popular methods include:
- Sheet Mulching: Layer cardboard/newspaper over turf, top with compost and mulch. Wait 4–6 weeks before planting.
- Solarization: Cover area with clear plastic for 4–6 weeks in summer sun to kill grass and weed seeds.
- Manual Removal: Use a sod cutter or shovel for small areas.
Dispose of removed material properly—avoid composting invasive weeds.
Amend Soil and Plan Irrigation
- Test Soil: Amend sandy soils with organic compost if needed, but avoid over-fertilizing natives.
- Irrigation: Retrofit existing sprinklers with drip irrigation or micro-sprays to deliver water directly to plant roots. Cap off unused heads to prevent waste.
Lay Out and Plant
Arrange plants on the ground according to your plan before digging. Adjust placements for the best look and spacing. Dig holes twice as wide as the root ball, but no deeper. Water plants well at installation—this helps roots settle and reduces transplant shock.
Mulch and Finish Hardscape
- Mulch: Apply a 2–3 inch layer around plants, keeping mulch away from stems to prevent rot.
- Paths/Borders: Install stepping stones, gravel, or pavers now to avoid trampling new plants later.
Water thoroughly after finishing, and inspect for low spots or runoff issues.
Step 7: Establishment and Maintenance Best Practices
Watering Schedule
Even drought-tolerant landscapes need regular watering during the first 6–12 months. Water new plantings 2–3 times per week for the first month, then gradually reduce frequency. Once established, most natives thrive on rainfall alone except during extended dry spells.
Weed and Pest Control
- Pull weeds promptly; mulch helps suppress new growth
- Monitor for common pests like aphids or mealybugs, but avoid routine pesticide use—native plants attract beneficial insects
Pruning and Fertilizing
Prune shrubs and perennials lightly after flowering to maintain shape and encourage dense growth. Fertilize sparingly—most natives and drought-tolerant plants do not need much supplemental feeding. Use slow-release, balanced fertilizers if soil tests show deficiencies.
Long-Term Upkeep
- Refresh mulch annually to maintain weed control and soil moisture
- Inspect irrigation systems seasonally for leaks or clogs
- Replace any struggling plants with better-suited species
- Document your successes and challenges for future reference or to share with neighbors
Step 8: Case Studies from Southeast Seminole Heights
Case Study 1: The Pollinator Paradise
The Martinez family transformed their 600 sq ft front yard with a mix of native wildflowers, muhly grass, and a meandering gravel path. Their initial investment was under $2,000 with mostly DIY labor. Within a year, they reduced water use by over 70% and now enjoy butterflies and bees year-round. Their biggest lesson: “Start with a clear plan, and don’t be afraid to ask local gardeners for advice.”
Case Study 2: Low-Maintenance Curb Appeal
Retiree Linda S. hired a local landscaper to replace her patchy St. Augustine lawn with pine bark mulch beds, coontie, firebush, and accent boulders. The project cost $4,800 but eliminated weekly mowing and cut her water bill in half. Her advice: “Invest in a professional design if you can—my yard looks great every season with almost no effort.”
Step 9: Troubleshooting Common Challenges
Yellowing Leaves or Poor Growth
- Check for overwatering or poor drainage; most drought-tolerant plants dislike soggy roots
- Test soil pH—some natives prefer slightly acidic conditions
Persistent Weeds
- Increase mulch depth or add edging to keep grass and weeds out
- Hand-pull before weeds go to seed
HOA or Neighbor Concerns
- Share your landscape plan and explain environmental benefits
- Choose tidy, well-maintained plantings to set a positive example
Conclusion: Embracing a Water-Wise Future in Southeast Seminole Heights
Transitioning to a drought-tolerant landscape in Southeast Seminole Heights is much more than a trend—it’s a smart, sustainable investment in your property and community. By understanding your yard’s unique conditions, setting clear goals, and choosing the right plants and materials, you can create a beautiful, resilient outdoor space that saves water, supports wildlife, and stands up to Florida’s unpredictable climate.
The step-by-step approach outlined here ensures you don’t overlook key details, from initial planning and budgeting to compliance, installation, and long-term care. Remember, the most successful projects start with solid research and a willingness to adapt. Don’t hesitate to seek advice from local experts, neighbors, or the Florida Native Plant Society if you hit a snag. And if you’re working with an HOA, proactive communication and a neat, well-maintained design can win over even the staunchest traditionalists.
As more Southeast Seminole Heights residents make the switch, our neighborhood benefits from less runoff, more wildlife, and vibrant, distinctive yards that reflect our unique Florida heritage. Whether you dive in with a full front yard overhaul or start small with a single bed, every step toward drought-tolerant landscaping is a step toward a greener, more beautiful community. Your yard can be both a personal retreat and a local inspiration—so dig in, get your hands dirty, and watch your water-wise oasis flourish for years to come.
Could you clarify how to test soil drainage more precisely? The article mentions digging a small hole and timing the drainage, but what would be considered ideal or problematic drainage times for our area?
For Southeast Seminole Heights, after filling the test hole with water and letting it drain, refill it and time how long the water takes to drain completely. Ideally, water should drain within 1 to 3 hours. Faster than an hour means sandy, fast-draining soil; slower than 3 hours may indicate poor drainage or clay. Aim for that 1-3 hour range for drought-tolerant plants.